
Enhanced Developer Experience with Kalix JVM SDKs v1.3
- Eduardo Pinto.
- Senior Engineer, Lightbend.
- 22 August 2023,
- 9 minute read
Summary
In the fast-paced world of cloud-native application development, efficiency and productivity are paramount. Developers strive for streamlined processes, seamless local development, and swift feedback cycles. To this goal, Kalix has undergone significant enhancements that streamline the building process of your applications:
- A single command to run a Kalix Service and the default use of logs in plain-text (rather than JSON), making it faster and easier to run and debug your application.
- New typed-client so that your cross-component calls are less error prone.
- New TestKit Mocked Topic and native ARM proxy images for lighter, less cumbersome and faster integration tests.
Each of the above contributes to a more efficient, user-friendly, and robust development experience. In this blog post, we will explore the aforementioned improvements which become available in Kalix JVM SDKs v1.3.
Introduction - Sample
For demonstration purposes, we will use a simplified Auction service to explain the latest SDK features. Let us start by clarifying what this Auction service does:
- Handles creation of auctions and accepts bid requests.
- Provides a record of changes of each Auction for external consumption.
The following image depicts the Kalix components of this service:
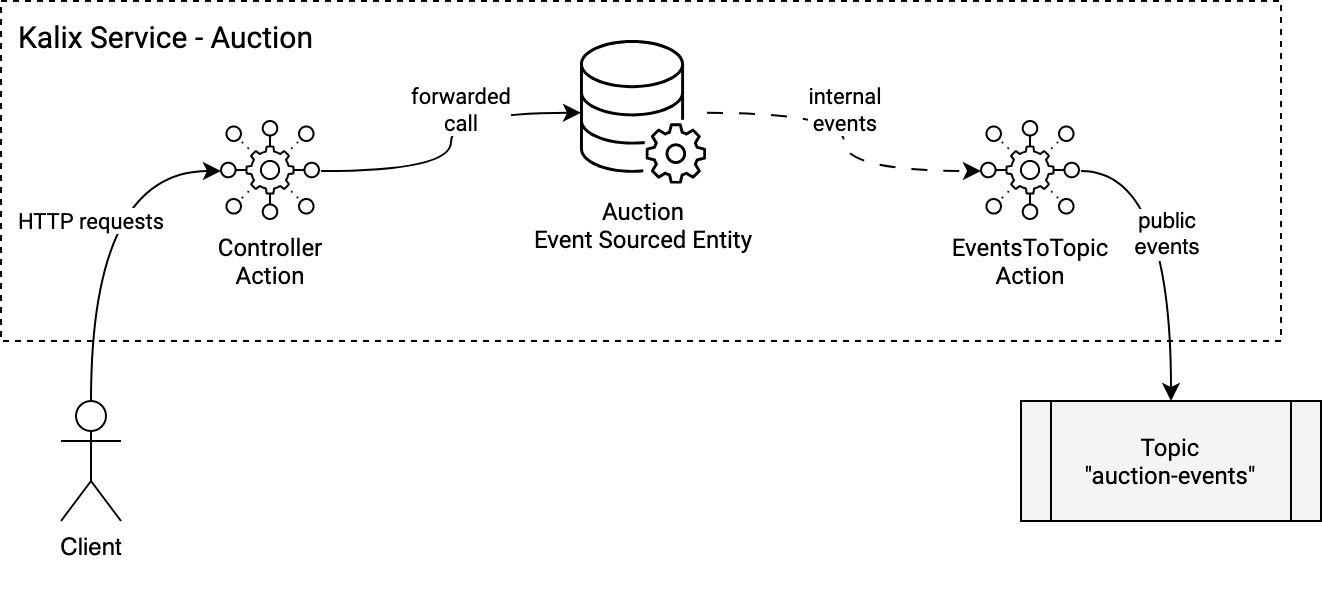
- The
ControllerAction serves as a proxy for the requests, validating and forwarding them for the appropriate Auction entities. - The
Auctionentity is an Event Sourced Entity, encompassing all the business logic and producing a stream of events. - The
EventsToTopicAction subscribes to the Auction entity’s events and transforms them into a public form before having them published to Kafka.
The details on how to implement such a service is out of the scope of this blog post, but you can have a look at the full sample’s source code here.
One Command to Run Them All
An essential part of the development cycle is the ability to run your code locally. In this regard, as part of testing a Kalix service locally, one needs to have the Kalix Proxy running as well.
Previously, the recommended approach was to run the Kalix Proxy separately by running docker-compose up on the side. Now, you are able to run both your service and the Kalix Proxy with a single command (or by running Main from the IDE):
mvn kalix:runAll
The resulting logs will contain logs both from the containers and the service itself. The lines coming from containers will have a prefix such the first one you can see below:
simple-auction-with-kafka-kalix-proxy-1  | 09:54:40.579 INFO  kalix.proxy.DiscoveryManager - gRPC proxy started at 0.0.0.0:9000
10:54:41.030 INFO  kalix.javasdk.impl.DiscoveryImpl - Info reported from Kalix system:  Service started and reachable at 0.0.0.0:9000
Note that the Kalix plugin will still use the docker-compose.yml file present on the repository. This means booting up Kalix Proxy but also any other configured image, in this case the Kafka dependency as well. The same behavior described above occurs when starting the Main function from IDE instead.
Additionally, if you would rather start up the Kalix Proxy separately with docker compose, you can start only the service with:
mvn kalix:runIn this case, when stopping the Kalix Service, whereas previously one would have to stop the Kalix Proxy as well, now you can just leave the Proxy running in the background and it will automatically discover, reconnect and start once you start your service.
If you don’t have a good reason to run them separately, we recommend the use of
mvn kalix:runAll and avoid bothering about anything else. For further information, check our documentation on Running Locally.If you have been using Kalix on previous versions you might notice that the logs are now written in plain-text format instead of JSON, being more human-friendly, with less noise and easier to read and debug, both when running the service locally but also when running integration tests.
Typed Component Client
Another major feature from this release is the introduction of the Typed Component Client for Kalix Java SDK (similar to what was available already for the Protobuf-based SDKs). Whenever you need to do a cross-component call, now you can take advantage of type safety and avoid a myriad of potential hard-to-debug problems. Whereas previously one would need to call the component with a regular HTTP path, now you can just do it with a method reference.
Looking at our sample, when we are receiving requests and want to forward them to the Auction entity, we can now take advantage of this typed client, as shown below:
@PostMapping("/create/{auctionId}/{target}")
public Action.Effect<Response> create(
    @PathVariable String auctionId,
    @PathVariable int target) {
  if (target <= 0)
    return effects().error("Target needs to be higher than 0.");

  var createCmd = new AuctionCommand.Create(target);

  var defCall = componentClient       // using the typed client
    .forEventSourcedEntity(auctionId) // to call an ES entity with this id
    .call(AuctionEntity::create)      // pass the reference method from entity
    .params(createCmd);               // pass in the params for above method

  return effects().forward(defCall);
}
To see the full code for this part of the code, see here.
TestKit Mocked Topic
We are also introducing a new feature to our TestKit allowing you to use a mocked topic on your integration tests. Until now, when a service depended on a broker the only way to test that integration was to run an external real instance of such a broker. Additionally, a real client was needed on your integration tests to interact with the broker, inject messages or assert on published messages. Now, you will be able to do that, regardless of the broker in use, directly from the TestKit with a common API.
As mentioned previously, in our Auction service we also publish the auctions events to Kafka. When using the TestKit Mocked Topic, an integration test for such scenario will look like this:
@Test
public void testAuctionFullCycle() {
  var auctionId = "auction1";

  // given: a creation of an auction with name auction1 and target value of 50
  var response = execute(
      componentClient
        .forAction()
        .call(AuctionControllerAction::create)
        .params(auctionId, 50));
  assertEquals("Created", response.msg());

  // when: 1 bid happens with value of 30
  var responseBid = execute(
      componentClient
          .forAction()
          .call(AuctionControllerAction::bid)
          .params(auctionId, 30));
  assertTrue(responseBid.msg().contains("accepted"));

  // and: another bid with value 51
  // when: 1 bid happens with value of 30
  var responseBid2 = execute(
      componentClient
          .forAction()
          .call(AuctionControllerAction::bid)
          .params(auctionId, 51));
  assertTrue(responseBid2.msg().contains("accepted"));

  // then: auction is closed and 4 events should be sent to broker (creation, bid, bid, closing)
  var createdEvent = topic.expectOneTyped(Created.class);
  assertEquals(auctionId, createdEvent.getPayload().id());
  assertEquals(50, createdEvent.getPayload().target());

  List<EventingTestKit.Message<?>> bids = topic.expectN(3);
  var bid1Event = bids.get(0).expectType(BidAccepted.class);
  assertEquals(30, bid1Event.value());

  var bid2Event = bids.get(1).expectType(BidAccepted.class);
  assertEquals(51, bid2Event.value());

  bids.get(2).expectType(Closed.class);

  // and: no further events
  topic.expectNone();
}
In the above code, note the use of topic.expectOneTyped which allows you to confirm what is being sent out to the broker (Kafka in this case). The API offers different methods to both read and write to the broker, read multiple messages (typed or raw), etc.
With it, you can focus on what goes in and out of the broker with minimal boilerplate, making your integration tests lighter to run and speeding up the feedback cycle.
Nevertheless, for certain types of tests, you might still be interested in using a real broker instance and in such scenarios, you can just configure the test to not use the TestKit mocked topic. For more details, refer to our documentation on Testing the Integration.
Since we are talking about integration testing, another relevant improvement is that we are now publishing native ARM images for the Kalix Proxy. For this reason, anyone using a computer with an Apple processor will notice a significant speed up when running these integration tests locally (~5x faster). Granted this all depends on the local setup but whereas previously we’ve seen integration tests take ~30 secs to be run, will likely run now in less than 5 secs.
Deploying
As a final step, let’s actually go ahead and deploy our small Kalix service. Although not directly related with the SDK, the new Kalix Container Registry (KCR) allows you to deploy your services without having to push images to a third-party registry.
Assuming we have a project created already and we have previously configured Kalix Container Registry, we need to update our pom.xml with our repository and project. To know the repository, after configuring KCR, you can do:
kalix auth container-registry print
Kalix Container Registry path is: 'kcr.eu-central-1.kalix.io'
Use this path to push images to the container registry. The same path is also used when deploying the service
Since our project is called “auction-sample”, we will update the dockerImage in our pom.xml to be:
<dockerImage>kcr.eu-central-1.kalix.io/lightbend/auction-sample/${project.artifactId}</dockerImage>Now, the only thing remaining will be to run:
mvn deploy kalix:deployBy using the configured Kalix project, this will build and deploy the latest version of our service to Kalix cloud and boot-up the service. Using the KCR for deploying your Kalix services is easy as authentication is built-in. Another benefit is that deployments, restarts and scaling do not depend on any connectivity to external registries.
For this particular sample we would need to configure Kafka broker as well but that has not changed thus is out of the scope of the blog. Feel free to check our documentation here if interested.
Final remarks
This blog shows how some of the latest improvements in Kalix JVM SDKs v1.3 directly contribute to a better Developer Experience when it comes to running, debugging and testing your Kalix service. If you want to have a look at the sample’s source code, please find it here.
This is not the end of the road though, as more improvements and new features are lined-up, be sure to stay tuned on our blog for all the news regarding Kalix.