
The Kalix Developer Experience
Prepare to explore a frictionless and efficient developer experience.
Choose an SDK and use case to get started.
Design Kalix service
1Use case introduction
This e-commerce use case consists of a ProductStock and a ShoppingCart. ProductStock models items that are available for sale. ShoppingCart models items that the customer wants to buy.

ProductStock
ProductStock has a quantity that represents the amount of Product that is available for sale. ProductStock can be created, read, updated and deleted.
Shopping Cart
Shopping Carts have an ID and a collection of ProductStock. ProductStock can be added and removed from the Shopping Cart. The Shopping Cart can also be checked out.
Kalix Components
Kalix applications are built by writing code using various abstractions called Components. Components abstract away common concerns such as state management, pub/sub and scheduling.
There are 4 main types of Components that can be used:
Entity
Action
View
Workflow
- Entities: for stateful business logic and state management.
- Actions: for stateless business logic.
- Views: for querying data from multiple entities.
- Workflows: for modeling business processes that span multiple services.
Application of Components: Entity
For the rest of this use case, we will focus on using an Entity to implement ProductStock. Now that we have designed our Kalix Service, we are ready to move on to Step 2: Kickstart Kalix development project.
Kickstart Kalix development project
2Kalix development tooling helps to get started quickly.
Prerequisites
To get started with Kalix, the following prerequisites are required.
Java: Java 17 or later
Maven: Apache Maven 3.6 or later
Docker: Docker 20.10.14 or later
Maven archetype
A Kalix Maven archetype was used to generate a recommended project structure:
mvn archetype:generate \
  -DarchetypeGroupId=io.kalix \
  -DarchetypeArtifactId=kalix-spring-boot-archetype \
  -DarchetypeVersion=1.3.7
The following properties were used during project creation:
Define value for property 'groupId': com.example
Define value for property 'artifactId': kalix-trial-shoppingcart
Define value for property 'version' 1.0-SNAPSHOT: :
Define value for property 'package' com.example: : com.example.shoppingcart
In the end, a recommended project structure was created:
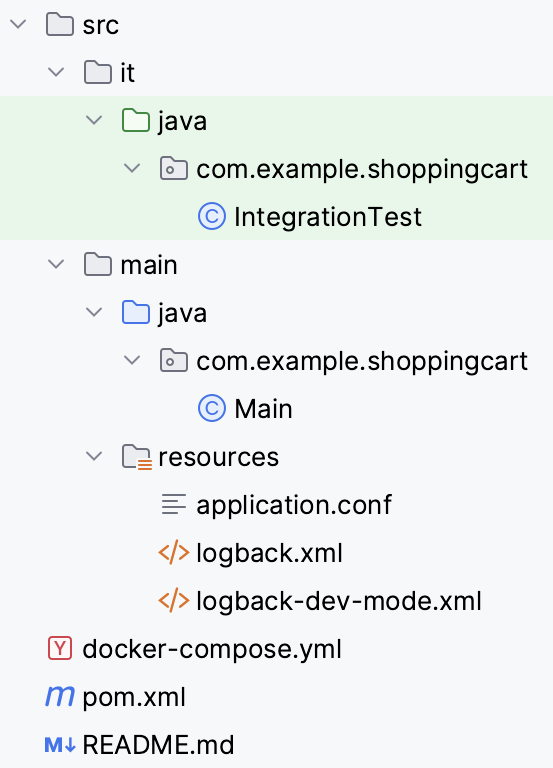
pom.xmlAll Kalix plugins and dependencies pre-configured and ready to use.IntegrationTestSkeleton for implementing Kalix integration tests.MainA Java class for bootstrapping the Kalix Service and all of its Components.
Describe data structures
3A Java class was created to represent the desired data structure for ProductStock.
package com.example.shoppingcart;

import com.fasterxml.jackson.annotation.JsonIgnore;

public record ProductStock(Integer quantity){
    public static ProductStock empty(){
        return new ProductStock(null);
    }
    @JsonIgnore
    public boolean isEmpty(){
        return quantity == null;
    }
}
ProductStock was given a field quantity of type Integer to represent the quantity of product available for sale.
Two additional helper methods relevant to ProductStock were added to the data structure:
- Helper method
empty()for creating new ProductStocks. - Helper method
isEmpty()to validate if theProductStockhas no remaining quantity.
Now that we have described our data structures, we are ready to move on to Step 4: Define API.
Define API
4The ProductStock API was defined by creating a ProductStockEntity class.
package com.example.shoppingcart;

import io.grpc.Status;
import kalix.javasdk.annotations.EntityKey;
import kalix.javasdk.annotations.EntityType;
import kalix.javasdk.valueentity.ValueEntity;
import kalix.javasdk.valueentity.ValueEntityContext;
import org.springframework.web.bind.annotation.*;

@EntityKey("productId")
@EntityType("product-stock")
@RequestMapping("/product-stock/{productId}")
public class ProductStockEntity extends ValueEntity<ProductStock> {
  private final String productId;

  public ProductStockEntity(ValueEntityContext context) {
    this.productId = context.entityId();
  }

  @Override
  public ProductStock emptyState() {
    return ProductStock.empty();
  }

  @PostMapping("/create")
  public Effect<String> create(@RequestBody ProductStock productStock) {
    return null;
  }

  @GetMapping("/get")
  public Effect<ProductStock> get() {
    return null;
  }
}
The ProductStockEntity was made a Value Entity by inheriting from kalix.javasdk.valueentity.ValueEntity.
Notice that ProductStockEntity has an inner type ProductStock. ProductStock was the data structure described in Step 3.
Base path access to the ProductStockEntity was defined by the @RequestMapping("/product-stock/{productId}") annotation.
Both API methods create() and get() were exposed as REST endpoints using Spring’s @PostMapping and @GetMapping REST annotations.
Now that we have defined our API, we are ready to move on to Step 5: Implement business logic.
Implement business logic
5Business logic was implemented for the create() and get() API methods.
package com.example.shoppingcart;

import io.grpc.Status;
import kalix.javasdk.annotations.EntityKey;
import kalix.javasdk.annotations.EntityType;
import kalix.javasdk.valueentity.ValueEntity;
import kalix.javasdk.valueentity.ValueEntityContext;
import org.springframework.web.bind.annotation.*;

@EntityKey("productId")
@EntityType("product-stock")
@RequestMapping("/product-stock/{productId}")
public class ProductStockEntity extends ValueEntity<ProductStock> {
  private final String productId;

  public ProductStockEntity(ValueEntityContext context) {
    this.productId = context.entityId();
  }

  @Override
  public ProductStock emptyState() {
    return ProductStock.empty();
  }

  @PostMapping("/create")
  public Effect<String> create(@RequestBody ProductStock productStock) {
    if (currentState().isEmpty()) return effects().updateState(productStock).thenReply("OK");
    else return effects().error("Already created");
  }

  @GetMapping("/get")
  public Effect<ProductStock> get() {
    if (currentState().isEmpty()) return effects().error("Not found", Status.Code.NOT_FOUND);
    else return effects().reply(currentState());
  }
}
Helper methods provided by the Kalix ValueEntity class were used to implement business logic:
currentState(): provides read access for the ProductStock instance data.updateState(): provides write access for the ProductStock instance data.
For the create() API method, if the ProductStock does not previously exist, then the ProductStock data is persisted.
For the get() API method, if the ProductStock previously exists, then the data is returned.
The underlying Kalix platform ensures API methods are executed sequentially for each ProductStock instance. This prevents concurrent data access issues and ensures strong consistency.
Now that we have implemented our business logic, we are ready to move on to Step 6: Test.
Test
6Kalix test kits provide support for unit and integration testing.
A unit test was written for the ProductStockEntity create() method.
package com.example.shoppingcart;

import kalix.javasdk.testkit.ValueEntityResult;
import kalix.javasdk.testkit.ValueEntityTestKit;
import org.junit.jupiter.api.Test;

import static org.junit.jupiter.api.Assertions.*;

import java.util.UUID;

public class ProductStockEntityTest {
  @Test
  public void testCreate() throws Exception {
    var productId = UUID.randomUUID().toString();
    ProductStock productStock = new ProductStock(10);

    ValueEntityTestKit<ProductStock, ProductStockEntity> testKit =
        ValueEntityTestKit.of(productId, ProductStockEntity::new);

    ValueEntityResult<String> res = testKit.call(entity -> entity.create(productStock));
    assertFalse(res.isError());
    assertEquals("OK", res.getReply());
    ProductStock persistedProductStock = (ProductStock) res.getUpdatedState();
    assertEquals(productStock.quantity(), persistedProductStock.quantity());
  }
}
This unit test validates the business logic implemented in the create() method in the previous step.
If the ProductStock does not previously exist, then:
- The ProductStock data is persisted
- A reply of "OK" is returned
Now that we have tested our business logic, we are ready to move on to Step 7: Run locally in a prod-like environment.
Run locally in a prod-like environment
7Kalix provides a frictionless and efficient local development experience.
In a single terminal, with a single command mvn kalix:runAll the Kalix service was run locally and exposed at localhost:9000.
mvn kalix:runAll
...
INFO  kalix.javasdk.impl.DiscoveryImpl - Info reported from Kalix system:  Service started and
reachable at 0.0.0.0:9000
The API method for creating ProductStock was manually tested using cURL:
curl -XPOST -d '{
  "quantity": 10
}' http://localhost:9000/product-stock/apple/create -H "Content-Type: application/json"
The expected result was returned:
"OK"The API method for getting ProductStock was manually tested using using cURL:
curl -XGET http://localhost:9000/product-stock/apple/getThe expected result was returned:
{"quantity":10}Now that we have run locally in a prod-like environment, we are ready to move on to Step 8: Deploy and Run on Kalix Platform on the Cloud provider of your choice.
Deploy and Run on Kalix Platform on the Cloud provider of your choice
8Deploy
1. Install the CLI
Installing the Kalix CLI is the first step to getting started.
2. Register for a free account
The CLI is used to register for a free account:
kalix auth signup3. Authenticate the CLI
The CLI is used to log in to Kalix using your credentials:
kalix auth login4. Create a project
The CLI is used to create a project in Google Cloud us-east1.
kalix projects new ecommerce --region=gcp-us-east1 --organization=my-organization5. Authenticate Kalix container registry
The CLI is used to authenticate the local Docker client to the Kalix container registry:
kalix auth container-registry configure6. Deploy service
The Kalix service is deployed to the project:
mvn deploy kalix:deploy7. Verify deployment
The deployment is verified to ensure it was successful:
kalix service listThe deployment was successful:
NAME                                         AGE    REPLICAS   STATUS        IMAGE TAG
kalix-trial-shoppingcart                     50s    0          Ready         1.0-SNAPSHOT
Run
Start local proxy
The CLI is used to set up a local proxy to receive requests and forward them to the deployed service. This enables manual testing of the service without exposing it to the internet.
kalix service proxy kalix-trial-shoppingcartTest ProductStock create
The API method for creating ProductStock was manually tested using cURL:
curl -XPOST -d '{
  "quantity": 10
}' http://localhost:8080/product-stock/apple/create -H "Content-Type: application/json"
The expected result was returned:
"OK"Test ProductStock get
The API method for getting ProductStock was manually tested using using cURL:
curl -XGET http://localhost:8080/product-stock/apple/getThe expected result was returned:
{"quantity":10}What to do next
Now that we have finished exploring this use case virtually, we are ready to explore it locally.
Ready to Experience Kalix Locally
Download or clone the java SDK e-commerce use case.
Instructions
Once you've downloaded the project files to your local machine, refer to the included README.md file for instructions on how to proceed.